| Opera - the fastest browser on earth! | |
| BeOS Linux/Solaris Mac OS/2 QNX Symbian OS Windows | |
|
Email and OperaEmail is the most widely available and popular internet tool in the world. As an Opera user, you have at least two different, yet complementary, types of email services available to you.
The Opera 5 browser includes a full-featured email client (program) that you can use with your existing POP/SMTP email account(s). This program is integrated with the Opera browser interface. You can conveniently use the Opera emailer while browsing with Opera.
You can also read and write your email while offline, save, and then send and receive your messages later when you go online again. This document explains in detail how to set up and use the Opera email client. (If you prefer to use your existing email client,
see The other email service is OperaMail, which is a free, web-based email service. "Webmail", as it is sometimes called, differs from client-based email in the way that mails are stored and accessed. When you use web-based email, your mails are not downloaded from the remote server. They can only be read and written while you logged into your account online. The OperaMail web interface is handy because it is accessible from anywhere that you can use a browser. To sign up for an account, see the OperaMail homepage. The Opera emailer, one step at a time:If you are new to Opera, it may help you to get familiar with the Opera interface before beginning this tutorial. The following instructions with images will show you how to use Opera's built-in email client. Detailed instructions in text only can be found in the Help.
1) Setting up an email account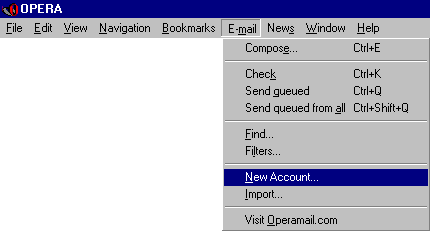
First of all...SelectNew account. A dialog box will pop up. In this dialog box, there are five tabs, as you will see in the following image... 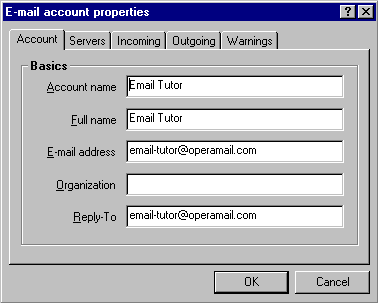
Email account propertiesIn theE-mail account propertiesdialog box, only the first two tabs, Accountand Serversare essential in setting up your account. The other three tabs, Incoming, Outgoing, and Warnings, are there for adjusting your personal preferences and are explained in detail in the help. The Account Basics properties, as shown in this image, require:
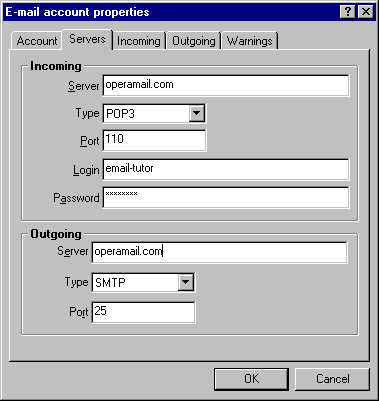
Email serversClick on theServerstab of the E-mail account properties box. Here you need to enter specific mail server information in order to send and receive mail. Your Internet Service Provider or your System Administrator will have provided you this information about your email account. Just as in postal mail, email requires two types of mailboxes. Email is sent, received, and stored by computers called
What's next?Now that you have set up the email account and server properties, you can begin to use the Opera email client. There are more options available to you, but it is not necessary to investigate them in order to use Opera email. If you wish, you may configure the advanced preference settings in the E-mail account properties dialog (as shown in the image above, theIncoming, Outgoing, and Warningstabs). This is detailed in the Help. Continue to Part 2: Exploring the user interfaceOr go back to the Tutorial |
||||||||
|
Support Desk |
Contact Us |
Webmaster |
Privacy --
Last modified: Sunday, 17-Dec-2000 19:13:16 UTC design by union -- Copyright Opera Software - © all rights reserved earthlink - put your business online today. |
